Friday, January 27, 2012

Warbler Invites Revealed

Now that most people have received their invitations, it's time for the reveal! Here are our handmade, Catprint printed invites. Let's take a look at the President's invite.

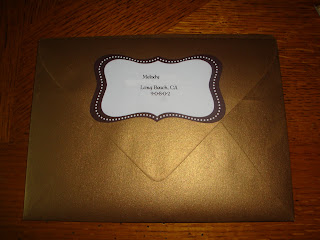
Envelope in Antique Gold

Damn, I love that color

We wanted our invites to reflect our red and gold color scheme. I really liked the idea of having gold envelopes, it's kind of like our guests are getting a golden ticket. We tracked these down at Paper Source along with all the labels and baker's twine. Paper Source = one-stop-shop!

 The wrapped invite

After our guests tear apart the envelope (let's be honest), they will see the whole invite lovingly tied with twine. I haven't seen too many invites that use photos, but we wanted to use one of our engagement photos for a more personal feel. I think it's likely that our guests will hold on to the invite longer if our mugs are on it.

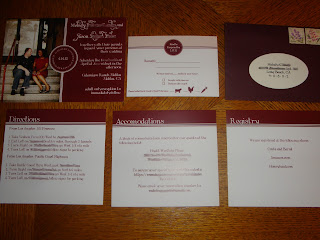
 The complete suite

Cow, chicken or carrot?

I put a lot of thought into the RSVP design. I wanted to make it really clear what the guests should do. I'm not gonna lie, the first time I got a wedding invite and I saw the line that looked like this M______, I wrote in Melody. True story. Even though our guests are probably smarter than me, I thought using "Names" was probably a better idea. The cute animal images are completely unnecessary since we're having a buffet. But, I wanted them there for my own amusement.

The whole shebang

The only trouble we had with our invites were spelling errors. Hive, please proofread your invites! And don't just read them on your computer screen, actually print them out and read them through. After we got our proof back from Catprint, I just made sure the photo looked good. MOH J5 found two glaring spelling errors after we had already given Catprint the go ahead to print the finished invites. Unfortunately it was too late and in the end we had to shell out extra money for more invites, sans the spelling errors. It wasn't a huge amount, but it could have been avoided. I should really know how to spell "o'clock" and "share" by now. But, we're happy with the finished product!

Did anyone else have any embarrassing spelling errors on their invites?

Thursday, January 26, 2012

Get With the Program

Mr. Warbs and I never planned on making programs for our ceremony. Since our ceremony will be super short we thought it might be pointless. Then I thought we should probably write up a little blurb about our wine box. And I also wanted to honor our loves ones who had passed. I wasn't interested in traditional programs: sheets of paper, fans and the like. Those are fine and dandy, but if we're going to do programs, I want something our guests can have fun with. That's when I found Pinterest.

Pinning all the live long day!
 Image via Pinterest.com

After this life changing event and hours of wasted time at work, I didn't want them anymore, I needed programs. Why? Because, I had to justify all those damn pins. And I found a couple of really creative ones!

Paper bag programs to hold poms. Genius.
Image via Underconsideration.com

Image via Underconsideration.com

I like these programs because they serve a dual purpose. Guests can check out your craftiness and ceremony info before the whole shebang. Then after the ceremony, they can open up their bags and shower you with it's contents, whether it be poms, rose petals or slices of cheesecake. I personally prefer the last one. Obviously.

The reality of me making these happen? Pretty slim. I don't want to pay to have them done and I'd probably screw up my printer trying it myself. Has anyone tackled these before? I'd love to hear how you made them!

On the other hand, I could definitely make these happen:

Cootie Catcher programs! Hello, fifth grade!

Cootie Catchers, or Fortune Tellers, have a special place in my child like heart. I remember making these all the time in school. Pick a color, pick a number and then your fortune is revealed. I always ended up with something like "You're going to fall in mud today" or "Jacques Brown likes you". I read both of those as more of a threat than a fortune. These wedding cootie catchers can be used as programs for the ceremony, a menu for the reception or just for "fun facts" about the couple. The thought of our guests sitting around in formal wear playing with a Cootie Catcher makes me crack up. And for that reason, I must have them!

I even made a Cootie Catcher for Mr. Warbs' 31st birthday. Instead of fortunes, I wrote in activities like "eat cake" and "night picnic". That was the first birthday we celebrated together so Cootie Catchers hold a special meaning for us. The best part is that there are templates online that make it really easy to do these yourself. An easy DIY project? I'm in!

Are you making out of the box wedding programs or staying traditional?

Monday, January 16, 2012

They. Are. Out!

Personal photo

Guess what, Hive? Our lovely invites are done and mailed out! After months of designing, redesigning, agonizing over wording and dumb spelling errors we are done! Celebratory dance break! We sent these babies out last week and have already gotten a couple of RSVPs back. Thanks, Auntie Cookie and Warbler In-laws! When we get a few more back, I'll share all of the details. For now I leave you with our golden envelopes. I love these envelopes so much that Mr. Warbs and I drove to two different stores to find them. That's two different stores that were about 50 miles apart. While Mr. Warbs may not have been thrilled, I know I don't have to explain myself to you Hive. You know what bridal brain is all about.

Has anyone else completed their invites recently?

Saturday, January 14, 2012

Love Letter and Wine Box pt 2

After our misadventures in woodburning, Mr. Warbs stepped up to stain the box. We originally ordered the unfinished box online knowing that we would eventually stain it. We went to Home Depot to pick out a nice rustic looking color, a drop cloth and some paint brushes. While the box's lid was being worked on by BM Tata's dad, Mr. Warbs went to work on the rest of the box. Staining is pretty easy to do, but if you're going to stain wood here's a tip to make it easier on yourself: sand the wood first! It helps the wood absorb the stain better. Totally a foreign concept to me, but apparently everyone's part of a secret club that knows about things like this!

Anyway, we neglected to do that and it gave Mr. Warbs a bit of trouble to get the wood dark enough. The first couple coats of stain seemed to roll off the wood like water. I think he must have used four or more coats in order to get the box dark enough. When we got the lid back, (which BM Tata's dad had sanded) it only needed one coat of stain. If we had added another it would have been a completely different color than the rest of the box.

After giving the box a couple of days to dry we were happy with the finished color!


The next step was adding in the foam inserts. Sure we could have skipped this step as it's not really necessary. But, I was afraid the glasses would rattle around in the box and break so we chugged ahead. Every tutorial I found online recommended closed cell foam, but I couldn't find that anywhere so we settled with ordinary building foam from from Home Depot. In my opinion, it worked fine and was a lot cheaper, but if you can find the other stuff good for you!

Cheap foam

I cut out two pieces, one to lie on the bottom of the box and one to cut out the wine glass shapes. The piece on the bottom keeps the glasses from touching the wood, adding extra protection. I tried to cut the pieces to match the inside of the box, leaving a little wiggle room. 


I wouldn't recommend cutting this on your carpet. It took forever to clean up all those little foam pieces.

Next I laid the glasses and the wine bottle we're using on a piece of foam and traced the shapes. Make sure to trace the shapes of the actual glasses and wine bottle you're going to use! Since the shapes are going to be pretty precise, you might run into a problem later if the new glasses you won't to use don't fit snugly. 

Both the wine and the glasses were bought at Costco. Did I mention how much I love Costco?


After I traced the shapes a couple of times, I cut out the shapes with an X-acto knife. As you can see, I kind of messed up on the left side a bit, but the felt covers up any mistakes. Thank God. Next I glued the two pieces together to create one thick piece.

Here's the part where I made a simple idea much much harder. Originally I planned to glue the felt on. I actually started by gluing the felt into the shapes first. I was then going to cut out pieces of felt to fill in the rest. I. Was. Nuts. I have no idea why I thought this was a good idea. Halfway through it looked like a weird felt patchwork quilt. Nothing was even and it looked bad, Hive. Real bad.

 I can't even bear to show you photos of anything after this point.

While I was slowly losing my mind, Mr Warbs came in with the assist. He basically told me to stop making it harder than it was and just cover the whole thing with felt. At this point I was so frustrated I said, "If it's so easy, why don't you do it then?" And he pushed me aside and went to work. And finished what I had struggled with for two days in about 15 minutes.

He ripped out the stupid pieces I glued in and covered the whole foam block with felt. Then he put the glasses and wine bottle in their respective pieces to create the mold. He secured the pieces together on the back with glue and then placed the foam into the box. Then he was done. Like some kind of wizard.

See that blurry hand? That's how fast he worked!

Finished mold


Finished project!

It's good to have someone to call you out when you're being crazy. If I had told Mr. Warbs what I was planning from the beginning, I would have saved a lot of time and energy. DIY projects don't always have to be done by "yourself". Sometimes doing it together (tee-hee) works a lot better. And there's your cheesy lesson for today.

Has anyone else run into trouble turning their DIY project into reality?

All photos are personal

Friday, January 6, 2012

Love Letter and Wine Box pt 1

Remember how I talked about using a wine box for our ceremony and then promptly never mentioned the subject again? Yeah, I've been a bad bride. We bought an unfinished wine box with the intention of staining it and wood burning our names on it. Well, the box has been sitting in our apartment for months now, just begging to get all fancied up. Long story short? We lacked the motivation to get going on the thing. Every now and then I would get short bursts of motivation. One day I went out and bought a wood burning kit. Then something came up and I didn't think of the box again for two months. Another time I bought foam inserts and a X-acto knife...and the box sat for months. You get the idea. A few weeks ago, I set aside a specific day to tackle this project. I was tired of looking at the unfinished box with all of the tools stacked on top of it. So I grabbed the wood burner and practice wood and went to work. Yeah, it turns out wood burning is a much harder skill than I thought.

FAIL!

I did a horrible job. I called MOH J5 to try his hand at it and he gave up too. He did better than I did though, the cursive names are all his doing. The weird boxy names and "die" were my attempts. All we could do was laugh, it was so bad! We showed our sad attempt to BM Tata via Skype and after she stopped laughing at us, she said that her dad does wood burning projects all the time and could do ours. Um, yes please! We wanted to keep it simple, so I just asked for our name and the wedding date. What we ended up getting was way more than simple, it was fantastic!

Hot damn!

He did an amazing job and put so much more detail into it than I could have ever done.  Seriously, how cute is that heart?! After seeing how poor my practice attempt went, I'm pretty sure I would have destroyed our wine box. And I thought wood burning was going to be the fun part of the project. Silly Warbler. Next up: wood staining and foam inserts galore. 

Did anyone else have a hard time starting DIY projects?

Thursday, January 5, 2012

100 Day Stretch

Image via Chicoparty.com

Today officially marks 100 days until our wedding. Where did the time go? Even though we've been engaged for 13 months now, there's a panicky part of me that needs more time. But, thanks to our type A careful planning, everything is pretty much done! Mr. Warbs and I did a little dance when we got to the back page of our wedding planning checklist. We're in the home stretch, Hive! Just a few more big things to conquer and then all that's left is the little details that keep me up at night. Pssh, no big deal.

A few more big things to share first before we get into the nitty gritty:

1. Our wine box! The bane of my existence, the center of our ceremony, this thing kicked our asses.

2. Invitations. Almost done with these. We're planning on mailing them out a bit earlier than usual just because we're antsy like that.

3. Favors. I've flip flopped on these for a while. I just have some really good ideas, but no follow through. As is my nature. I'll work it out though. Just hope our guests are happy!

While my anxiety has slowly been building up approaching the 100 day mark, Mr. Warbs has remained as excited as he was the night he proposed. Every time someone mentions that we don't have much time anymore, my response is "I know! I'm freaking out! Ahh!" His response is usually "I know and I can't wait. The day can't come soon enough." Oh, Mr. Warbs, you've been trained well. Just know that even though I'm panicky about this wedding, I'm more than sure that I want to spend the rest of our lives together. Watching James Bond movies before bed, leaving funny quotes to each other on the door and kicking your ass at Monopoly Deal. Yeah, I said it. Married life, here we come!